Showing posts with label friends. Show all posts

Thursday, December 30, 2010

Snowy Snapshots


I haven't really shared my love of photography with you on My Northwest Nest, but believe me, I love photography. So I jump at the opportunity to take a few snapshots of friends, family, nature, old buildings. You name it, I'll take a picture of it.
A few weeks ago my best friend, Cat, called and asked if I could take a few pictures of her family. Their beautiful baby girl is almost ten months old and they've never had family photos taken. I was honored to be able to take their first family shots. I'm not a fan of the traditional family portrait. "Tilt your head this way" "Say pickles." That's not my style. I like outdoors, different angles, on the floor types of family pictures. Luckily Cat isn't a fan of your average family picture either.
We agreed on outdoor pictures, the ground wasn't an option since it was covered in snow but we were able to capture some pretty great shots. Cat and her husband found a random road blanketed in fresh snow and the baby was sleeping so we hopped out of the cars and snapped a couple pictures of just husband and wife. A nice reminder that even though so much of their life is now all about baby, first they are husband and wife, the best gift they can give their precious little girl.
So here we go...
I love the way her red sweater and his red scarf pop against the snowy background. I was wishing I had a red umbrella for a prop but their red accessories worked perfectly.
This next one is one of my favorites. At least the editing I did, makes it my favorite of the happy couple. If you look at the picture below you see a couple walking down a snow covered road. But...
If you look now you see the deer up ahead to the right. I put the focus on the deer and softened the rest of the photo. I love it! And luckily so did my subjects.
We spend about twenty minutes getting pictures of just the two of them then the little one woke up and was ready for her picture.
Of course I couldn't pass up this opportunity. It was like she was peeking over Mommy's shoulder asking me to take a picture. So cute!
By no means am I even close to a professional photographer, but I'm pretty happy with how these turned out. More importantly my friends are happy with how they turned out.

Blessings.

Monday, December 27, 2010

Merry Christmas

I hope you all had a wonderful Christmas with your loved ones. I most definitely did. We had a house full of company on Christmas Eve, twenty people filled the downstairs of our home throughout the afternoon and evening. Our house is not a very big one so it was a little crowded but every minute was memorable. On Christmas Eve we had appetizers, presents, a big ham dinner, Christmas Eve service, desserts and "holiday cheer."
Here's a peak at what our house was like Friday. Just imagine five different conversations going on and crazy kiddos squealing.
Lots of family.
And friends.
The whole group who stayed for dinner and church.
Christmas Eve with my best friend from high school. We haven't had Christmas together in ten years. So glad she's finally back home.
Yes, we do matchy Christmas pajama's. Our girls had so much fun with all the family and friends. We kept teasing our middle chick that she had crazy eyes. Too much dessert and fun.
And now Christmas morning, just the five of us.
Our morning was spent relaxing at home in our pajama's. It was fantastic. Just after lunch we packed up and headed down the road to my sister's house. My dad and his girlfriend and my mother and father-in-law met us there for more food and fun.
There you go, that was our Northwest Nest Christmas. We truly enjoyed our time with our families and friends. Now to clean up this mess.... Ugh!

Blessings.

Monday, November 8, 2010

Caramel Popcorn Jars

Seeing that all three of my little chicks are in school this year I wanted to help out as much as possible in their classrooms. Unfortunately it hasn't worked out like I planned. Apparently in fourth grade the students are independent enough that the teacher doesn't require parent volunteers. Because of the anxiety issues we're having with my first grader I have been advised to stay out of the classroom. Then there's my littlest chick, turns out there's more than enough volunteers for preschool. So I'm not spending as much time in the classroom as I would have liked.
I still want our teachers to know just how much our family appreciates them. For the autumn season I decided to make caramel popcorn jars for the teachers. This gift was so easy to put together, I think cutting the fabric took the most time. Either that or picking up the popcorn kernels that spilled over.
I took some medium size canning jars and filled them half way with a mix of white and yellow popcorn. Then filled the rest of the jar with caramel cubes. I picked up a cute autumn print fabric at Hancock on clearance. I think it cost me $1.19. Not bad. I used pinking shears to cut squares for the jar tops.
I can't remember the site I printed the labels from (I'm sorry.) I think I just googled "free autumn printables," clicked on images and picked the ones I liked best. I used raffia and jute to tie the We Love Fall, Give Thanks and owl character tags onto the jar. I did write instructions on how to melt the caramel on the back of the tags, about 8 cubes and a couple tablespoons of milk in the microwave.
I think they turned out pretty cute. I'm wishing I would have picked a different fabric because my fabric, popcorn, caramel, jute and raffia are all pretty... well... yellow. Oh well, now I know.
You could make these for friends, relatives, teachers, pastors, neighbors, etc.. I made a few extra for the other families in our dinner co-op.

Harvest blessings.

Linking to: All Thingz Related

Thursday, September 30, 2010

Autumn Candy Jars

It's officially Autumn which means routines are in full swing. School, cross country, Tuesday morning Bible studies, men's group, women's group, home group... Do I need to keep going? Or do you get where I'm going with this?
Last week my women's group started up again. I am SUPER excited, we're studying different books of the Bible. Anyway, last week we got together to plan the upcoming year over a very yummy dinner. An e-mail was sent out in advance for volunteer to bring salad, drinks, dessert, etc.. I missed the e-mail. That is until the day before we met. Everything for the meal was covered so I had to come up with something else for the ladies, and quick.
I had some baby food jars a friend had given me and a couple bags of M&M's in the Autumn colors. Idea!!
I'll decorate some baby food jars, fill them with candy and voila... gifts for the ladies.
I used my Cricut and the Give a Hoot cartridge to make little tags.
I painted the lids a chocolate brown color to cover the Gerber label and sell by date. Then to decorate the actual jar I used my hot glue gun and a few different materials. I wrapped jute, ribbon and raffia around the jars. (Yikes! Blurry picture, sorry.)
Then used jute or raffia to tie the labels on. Add some colorful M&M's (peanut and regular) and I was done. Literally just in time to walk out the door. Whew that was close!
Here is the final product.
Autumn Blessings.

Friday, July 16, 2010

How Does Your Garden Grow?

I think we can all agree there is just something about fresh, homegrown veggies straight from the garden. Last year we built a small raised bed in our back yard. We grew so many tomatoes we were giving away bowls of cherry tomatoes on a weekly basis! It was awesome to walk in the back yard, pick tomatoes, wash and serve!
Here's a peek at our garden last year. Cute, isn't it?
This year we're joining with four other families and growing a garden together. One of the families has some acreage just out of town and volunteered the space for the garden. We're growing all sorts of peppers, tomatoes, potatoes, squash and more!!
Taking care of this garden isn't like taking care of your grandma's garden. Weeding this piece of land involves delicious bbq's, Margarona's, root beer floats, surprise water balloon attacks and some fantastic friends!
Digging holes for the 7 feet high fence to go all the way around the garden.
Diggin in the dirt!
This is what happens when you garden in flip flops.
Margarona's.... YUM!!!
One of the husbands making steaks!
Do you have a community garden? Maybe something small in the backyard or even in your kitchen window? Don't you just love the harvest? I know I do!!

Blessings.


Saturday, July 3, 2010

Last Minute Flag Decor

I can't believe it's July 3rd, I've been posting Independence Day decor all week and I've got a couple more last minute things to show you. Hope you like them!
First is a flag made with a 2x4, this one is made by my friend Jamie and she actually wrote up a quick tutorial for you!
"I used two 8", two 6", and two 2" 2x4's, paper, mod podge, and I actually used a little wood glue to attach them together, and then raffia. Oh and Cricut cartridge 'all mixed up'."
And here is the flag I made.
It's really pretty simple to make. You tear or cut scrapbook paper to the size of your blocks and apply with Mod Podge. You can use an ink pad to distress the edges if you'd like. With mine I crumbled my paper into a ball and inked the wrinkles then smoothed it out and put it on the 2x4. Easy peasy. And SUPER cute. You may have seen them over at How Does She? Those ladies have some incredible ideas over there.
My final red, white and blue project is a centerpiece for my dining room table. I picked up this place mat from Kohl's with my special associate discount plus an extra 15% off. I spend like $1.12 on it. Woo hoo! It's been sitting on my table all by itself for a week or so and finally last night, the 2nd of July I put together these candle holders.
I've been saving salsa jars for a while now (they're mason jars) and didn't know what I would use them for. Storage maybe. Nope, I saw a post the other day in blogland where someone painted a flag on jars and put candles in them. Brilliant! I've got jars, paint and raffia! So here is my version of someone else's good idea and my new centerpiece.


Hope you all have a very happy and safe Independence Day!!

Blessings.

Monday, June 28, 2010

Baby's Here and Sleeping

No, there's no baby at my house but my close friend had a beautiful, healthy little girl three weeks ago. You can look back at her baby shower here. I wanted to take her something for her new arrival. So I picked up a super cute flip flops summer outfit and put together a "baby sleeping" sign for the front door.
Yet another quick, easy and inexpensive project. Here's a list of supplies:
  • Particle board, measured to 8x8 (already had)
  • Scrapbook paper (used leftover paper from the invitations)
  • Mod Podge
  • Cricut
  • Wire & Ribbon
I had Tall Man cut the particle board down to 8 square inches and sanded the edges smooth. Next I traced the board onto my paper and cut it to size. I chose to ink the edges of my paper, this is up to you, it kind of depends on the look you're going for. Once I had my paper inked just so I applied it along with the letters to the board with Mod Podge. Then I drilled my holes, cut and curled the wire, put it in place and I could have been done. I decided to put a coat of polycrylic over the whole thing to protect it from any weather that may blow in while baby is sleeping. I also had some leftover ribbon from the baby shower so I tied it on the wire. Ta da!
I'm pretty happy with how it turned out. What do you think?

Blessings.

Thursday, June 3, 2010

Happy Birthday K!

With three daughters it seems we have a birthday party to attend every other weekend. Which means lots of skate parties with cake and ice cream for my littles. And a lot of creative thinking for me.
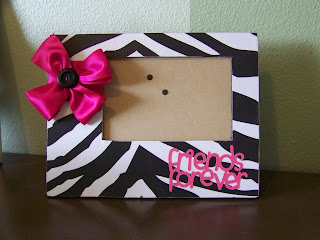
The most recent birthday party was for the girls across the street. The two of them and the three of my girls have quickly become bff's, besties, whatever the "cool" lingo is right now. The oldest girl turned 8 and has a pink, black and white room with zebra print accents so I used that as my inspiration. I got everything I needed at Michael's (Surprised? Didn't think so.)

What I used:
paper mache Letter K: a few bucks
Zebra scrapbook paper: 12x12 two sheets, one for each, $0.59 a piece
Mod Podge (already had)
Black craft paint (already had)
Pink Ribbon: $1.50
Buttons (already had)
Hot glue gun & glue (already had)
Total: under $3

Making this frame and "K" went pretty quickly. Directions for both are basically the same. I put the scrapbook paper wrong side up and traced the K and frame and cut the shapes out. I used black craft paint on the edges, this is optional but I wanted everything to look finished and professional.
Once the paint was dry I used Mod Podge to apply the scrapbook paper. I always smooth out my air bubbles with a Pampered Chef pan scraper thingy. They work wonderfully. After a few minutes the Mod Podge is dry I use a sanding sponge to get smooth out where my paper hangs over. Then cover with another coat of Mod Podge.
While I'm waiting for that to dry I made my ribbon flowers. I don't have a photo tutorial for the ribbon flowers but will have to put one together soon. I'll try and explain the best I can. I cut my ribbon about six inches long, laying it flat on my table I brought the ends together in the middle, you want the ends to overlap just a little. Next I gathered the ribbon in the center making it look like a bow tie and stitched it together.
Before I applied the flower I wrapped a piece of ribbon around the frame and K where I wanted the flowers to be. I just used a little double sided tape to hold the ribbon in place and hot glued the back to secure. I attached my "bow ties" one at a time with hot glue to make the flowers and with a little more hot glue I added the black buttons. On the frame I used my Cricut to cut out friends forever and applied it with Mod Podge.
There ya go! A personalized, relatively inexpensive birthday gift. The birthday girl and her mom went bananas when they saw these. I'd say they turned out pretty well.

Blessings.

Punkin Seed Productions