Showing posts with label painting. Show all posts

Thursday, September 16, 2010

Monogram Cupboard Sign

I bought a vinyl monogram M and est. date as a gift for my sister-in-law and her husband about a year ago and just got around to making it. Successfully that is. I bought a cupboard door from Habitat and the monogram from a friend who sold Uppercase Living. Originally this was going to be a Christmas present but it didn't turn out the first time.
I had lightly sanded the cupboard door to remove the glossy finish. Then painted it a barely off white color. So far so good. Loved the color and ready to apply the monogram. I followed the instructions for applying the vinyl but when I went to pull the backing off I also pulled off the paint. AAACCKK!!! It was peeling off, which also brought the vinyl with
it! What now?!?!
I called my friend and she explained to me that some of the newer paints are pretty tacky and if they haven't set for... like.. forever they can pull off with the backing. Especially when it's something with a super smooth finish.
Luckily my friend was nice enough to order me a new M free of charge. Thanks so much! Christmas had passed by the time I got it because I of course was putting the original gift together on like December 22nd. Oops.
The happy couple's anniversary is in June so I decided to make it an anniversary gift this year. But I went about it a different way. I pulled all the paint off and re-sanded the whole thing. Then painted just the outer frame of the door. For the center I decided to Mod Podge some scrapbook paper on it.
Of course this is just how these things work... I like it SOOO much more with the patterned paper behind the vinyl! Here is how it turned out!
What do you think? I think I need to make one for my home just like it. Love it!
Blessings.

Wednesday, June 23, 2010

Front Porch Crate

The 4th of July is coming up quickly so my family decided to display a little patriotism on our front porch. I had everything we needed on hand, so this project was easy to do on a whim. I've had a plain crate on my front porch since fall (you know, the ones from Michael's.) As soon as the crate came home I put some potted plants on top and called it good. I decided for Independence Day I'd turn the crate around and paint a flag.
I spray painted the back of the crate with Dove White and let it dry for about ten minutes. Next I took some Midnight blue and Christmas Red acrylic paint and painted some stripes and made room for stars. Once that dried I used white acrylic paint and a small foam brush to paint stars.
I really like the way it turned out, not perfect by any means, just kind of worn and weathered... perfect in my book. =o)
Blessings.

Thursday, June 17, 2010

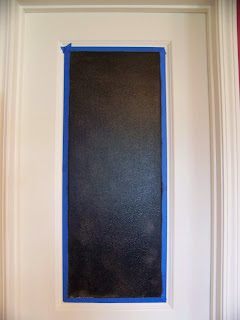
Chalkboard Pantry Door

For the last two years I have been trying to convince my Tall Man that our pantry door would look great if it were painted with chalkboard paint. He was not thrilled with the idea of two black panels on the door. About a year ago my favorite mother-in-law brought our girls a chalkboard, easel style. It's big, it's bulky, and takes up quite a bit of room in my pretty nice sized pantry. After stubbing a few toes, knocking it over and spilling chalk everywhere, Tall Man was on board with painting the pantry door.
As soon as I got the okay I ran to Lowe's with a 10% off coupon and picked up a can of chalkboard paint. Didn't take long and the door was taped and painted. Woo hoo!
I also picked up a pack of Chalk Ink pens from Michael's (kind of pricey at $12 for 4.)
I love the way it looks now. My girls like being able to doodle close by while we're at work in the kitchen. Here it is!
Blessings.

Linking to: Centsational Girl

Friday, April 16, 2010

The Big Reveal

I can hardly believe months of work has transformed into a few simple blog posts. Tall Man and I are so happy with our home office now that it's finished and I'm so excited to share it with you. I hope you all like it too!
Remember our before picture?
And here is our office now.

Hope you all have a wonderful weekend!

See our office featured in the March edition of
You're Fabulous at Centsational Girl
All Thingz Related


Friday, April 9, 2010

Table turned desk

Seven years ago we were a family of three, crammed in a second story, two bedroom apartment. We didn't have a dining room we had a nook of sorts. That year my dad bought me a dining room table for my birthday. It was a round table, one of those with the sides that fold down. It was perfect for Tall Man, myself and our then one year old. It didn't take long and we had out grown our round table and four chairs. We had to get a larger table to fit our growing family. So out to the storage went our little table...until recently.
I've seen writing desks like this from Pottery Barn for $599. Just a little out of my price range.


So I wasn't about to fork over all that money plus shipping when I had a perfectly good table sitting in my garage. With a little help from.. you guessed it, my Tall Man.. we removed the fold down sides of our round table, leaving us with this. (I call the rounded ends "detail")

I didn't bother sanding this table, looking back I should have taken some wood filler and filled the little grooves where my girlies left their mark, then lightly sanded and primed. Instead I went straight to priming with Zinsser and a foam roller, the detail on the legs was done with a foam brush. After letting the primer dry and cure I started painting with Olympic's Star Anise in egg shell. I ended up putting three thin coats of paint to get smooth coverage over that white primer. I let my paint dry for about 36 hours and brushed on two coats of polycrylic to get that finished shine. And here's the finished product.


Blessings.

Linking to: Centsational Girl


Wednesday, April 7, 2010

Stripes

No, I'm not talking about the Bill Murray flick. I'm talking about those beautiful green stripes you may have noticed in my last office post. Those stripes were quite the adventure! Seven long days of measuring, marking, taping, painting, peeling, taping, painting again. But boy was it worth it! I love them!
I knew I wanted stripes in ou
r office and thought green would provide the relaxing feel I was going for. I went down to Lowe's and picked up a handful of paint chips, picked my fave one and headed to Wal-Mart where they matched my $30/gallon color to their Bay Green by ColorPlace for about half the price. Next they mixed a gallon of the same green, only 60% lighter. This way I knew my colors would have the same base.
Usually picking a color is the hard part, this time color was easy, prep work was not. Again, I called in my tall man (what would I do if I hadn't married a 6'5" guy?) First, we measured 12 inch stripes and marked them with a pencil in three places up the wall, then
with a laser line we taped our lines. I started with two coats of the lighter shade, then peeled tape while the second coat was still wet. If you've ever peeled painters tape before you know the line you get where a little paint seeps under and you've got a nice line to one side. After letting the light green dry for 36 hours I followed the lines from before and taped for the darker color. But before I added my second color I went around the room real quick with a brush and my lighter color, I painted a quick coat on the tape to make a seal. After that dried I continued with two coats of Bay Green and pulled tape.
And voila! We have stripes!


Blessings.

Linking to: Centsational Girl

Tuesday, April 6, 2010

Mission:Impossible

I've heard it's impossible. Don't even try. Painting laminate furniture is a disaster waiting to happen. Sounds like a challenge to me! Especially since I don't have the budget to buy a new bookcase but I do have a cheapo laminate bookcase and some left over Almond Paste by Olympic.
Before I start any
project I do some research. I figure I'm not 16 anymore, it's okay for me to learn from other peoples mistakes. I sat down with my laptop and searched "painting laminate furniture" the first listing is on one of my daily reads Living With Lindsey . She walks you through the whole process.
I took the shelves out from my cheapo bookcase and lightly sanded them down with my
palm sander. After wiping them clean I used a foam roller to prime with some Zinsser primer. I always use a foam roller on a smooth surface, you don't get brush lines and for some reason the foam leaves a much smoother finish than a roller you'd use on a wall. I decided not to sand the frame of the bookcase for two reasons. 1. I'm too lazy. 2. Um... Okay, maybe I'm just lazy. I did prime the frame though, using a foam brush to get into the hard to reach corners. After letting the primer dry and cure I rolled on two coats of paint.
The next day I called for my tall man and we lugged the bookcase back upstairs and into our office. When I put
the shelves back in place I did scratch the paint in a few places but it was nothing a little touch pain couldn't fix. I did it, I painted laminate furniture and lived to tell about it.
So I went from this:


To this: