Showing posts with label Frames. Show all posts

Monday, December 20, 2010

Christmas Frames

It seems I make a frame for someone every season/holiday. Christmas is no different. I whipped up some Christmas frames for my little chicks teachers. I've said it before and I'll say it again... these frames are SO easy! And quick to make.
I seriously put these together in about thirty minutes right before I had to leave for work on the night before the girls Christmas parties.
Here is what I used:
  • wooden frame from Michael's ($1)
  • Christmas scrapbook paper
  • craft paint
  • Mod Podge
  • sand sponge
  • letters & shapes from Cricut
I painted the edges of the frames red and white, including the inside of the frame opening. Use a little Mod Podge to apply scrapbook paper. Once the Mod Podge dried I used my sand sponge to smooth the edges. I applied the letters and shapes with another thin layer of Mod Podge and of course put one more thin layer on top of the whole thing.
For this frame I put a little extra bling on it. I applied rhinestone stickers to the little swirls on peace. I also brushed on extra Mod Podge on the inside of the frame opening and sprinkled it with white glitter.
Hope you like!

Blessings.

Wednesday, October 6, 2010

Chore Chart

Chore charts are everywhere lately. Of course they are, who doesn't want their kids to pitch in around the house? And if you can make a cute craft out of it, it's like a win-win situation!
Have you seen all the chore charts around blog land? Here are just a few I've seen around.
How Does She? doesn't use a chart but a 2x4. Somewhat Simple and Casa Camacho also have great versions of the chore chart.
I started out with a small sheet of metal and scrapbook paper. I had it almost complete and decided I didn't like it. So I scrapped that idea and started over.
There are tons of ideas if you google "home made chore charts." They were great but when I saw I saw Brown Paper Packages dry erase chore chart, I decided it was perfect for our needs. Here is what I ended up with.

Blessings.

Monday, October 4, 2010

Acorn Frame

When I was a little girl my mom would take my sister and I to meet my grandma at a local park every fall. We would go in late September or early October, depending on how quickly the cool air was setting in. What were we doing there? We were collecting acorns. Tons of them! I remember my mom would clean them up and make Christmas crafts. Ornaments and all sorts of things. They were so cute!It has been years since we collected acorns but I've decided this year we should start again. Unfortunately we'll be missing a very important person, my grandma Bea. She was an amazing grandma, we shared a love of softball and grilled cheese sandwiches. We have however added four little ladies to the group, my three daughters and my niece, and we'll remember our grandma with every acorn we collect.
This autumn our weather can't really decide what it's going to do. One week it's raining and 55, the next it's sunny and 80. Aaackkk!! Makes it hard to plan. My mom decided just to send me some acorns she had from a past trip to the park so I could start the autumn crafts I had in mind. We will go collect acorns as a family when the weather makes up it's mind and maybe my mom will show us how to make the Christmas ornaments she made when I was a child.
My first acorn project was inspired by one of my very favorite magazines, Better Homes and Gardens.
I haven't decided what I'm going to put in the frame but here is how my acorn frame turned out.
In these pictures, it's framing my dining room table centerpiece. I'm sure I'll find something to frame. Maybe it will sit empty until I go with my mom, sister and our girls to collect acorns, restarting a family tradition.
Do you have any special autumn family traditions? Do share!

Autumn Blessings.

Thursday, June 3, 2010

Happy Birthday K!

With three daughters it seems we have a birthday party to attend every other weekend. Which means lots of skate parties with cake and ice cream for my littles. And a lot of creative thinking for me.
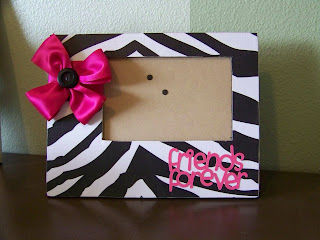
The most recent birthday party was for the girls across the street. The two of them and the three of my girls have quickly become bff's, besties, whatever the "cool" lingo is right now. The oldest girl turned 8 and has a pink, black and white room with zebra print accents so I used that as my inspiration. I got everything I needed at Michael's (Surprised? Didn't think so.)

What I used:
paper mache Letter K: a few bucks
Zebra scrapbook paper: 12x12 two sheets, one for each, $0.59 a piece
Mod Podge (already had)
Black craft paint (already had)
Pink Ribbon: $1.50
Buttons (already had)
Hot glue gun & glue (already had)
Total: under $3

Making this frame and "K" went pretty quickly. Directions for both are basically the same. I put the scrapbook paper wrong side up and traced the K and frame and cut the shapes out. I used black craft paint on the edges, this is optional but I wanted everything to look finished and professional.
Once the paint was dry I used Mod Podge to apply the scrapbook paper. I always smooth out my air bubbles with a Pampered Chef pan scraper thingy. They work wonderfully. After a few minutes the Mod Podge is dry I use a sanding sponge to get smooth out where my paper hangs over. Then cover with another coat of Mod Podge.
While I'm waiting for that to dry I made my ribbon flowers. I don't have a photo tutorial for the ribbon flowers but will have to put one together soon. I'll try and explain the best I can. I cut my ribbon about six inches long, laying it flat on my table I brought the ends together in the middle, you want the ends to overlap just a little. Next I gathered the ribbon in the center making it look like a bow tie and stitched it together.
Before I applied the flower I wrapped a piece of ribbon around the frame and K where I wanted the flowers to be. I just used a little double sided tape to hold the ribbon in place and hot glued the back to secure. I attached my "bow ties" one at a time with hot glue to make the flowers and with a little more hot glue I added the black buttons. On the frame I used my Cricut to cut out friends forever and applied it with Mod Podge.
There ya go! A personalized, relatively inexpensive birthday gift. The birthday girl and her mom went bananas when they saw these. I'd say they turned out pretty well.

Blessings.

Punkin Seed Productions

Wednesday, May 5, 2010

Mother's Day Frame

Mother's Day is this weekend! Can you believe it? It seems like Easter was just last weekend!
I put these frames together for all the Mom's, Grandma's, Noanie's and Grammy's in our life. Between my husband and I our girls have five Grandma's and one Great-Grandma. Wowza!

All you need is:
wooden frame (from Michael's $1)
Mod Podge
Scrapbook paper
embellishments of your choice

I realize we're cutting it really close to Mother's Day and this is a great home made gift for those last minute ladies. You can make this cute frame in an afternoon with no problem. First I used white craft paint to paint the edges of the frame to give it a little more finished look. After the paint dried, I traced the frame onto my scrapbook paper and cut it out. Next apply the paper with Mod Podge, wait to dry, sand the edges, apply another thin coat of Mod Podge. Lastly I applied my flowers & buttons with a little hot glue and "love" with just a little more Mod Podge. And here they are!

Friday, April 23, 2010

Scripture in Dollar Tree Frame

Last week I showed you the Dollar Tree frame I spray painted for our master bathroom. Inside that frame is scripture to help you have a "positive argument" with your spouse. I thought I'd share with you the verses I read each day when brushing my teeth and getting ready for the day. They are nice little reminders of what's important.
  • Listen more than you talk.
James 1:19 Everyone should be quick to listen, slow to speak and slow to become angry, for man's anger does not bring about the righteous life God deserves.
  • Remain calm; keep your voice down
Proverbs 5:1 My son, pay attention to my wisdom, listen well to my words of insight.
  • Keep current; leave old issues behind.
Phil 3:13 Forgetting what is behind and straining toward what is ahead.
  • Be ready and willing to ask for forgiveness or offer it.
Col 3:13 Bear with each other and forgive whatever grievances you may have against one another. Forgive as the Lord forgave you.
  • Guard your tongue from saying something you will regret later.
James 3:10 Out of the same mouth come praise and cursing. This shouldn't be.
  • Pray together.
1 Thess 5:17 Pray continually.


I hope these little bits of wisdom can help you through your day. Have a great Friday!